For years I ladled scalding soup into a countertop blender, clamped a dish towel over the lid, and held my breath while hot liquid tried its best to redecorate my kitchen. Twice it won. The second time left a red streak of tomato bisque across the ceiling and put me off homemade soup for most of a winter.
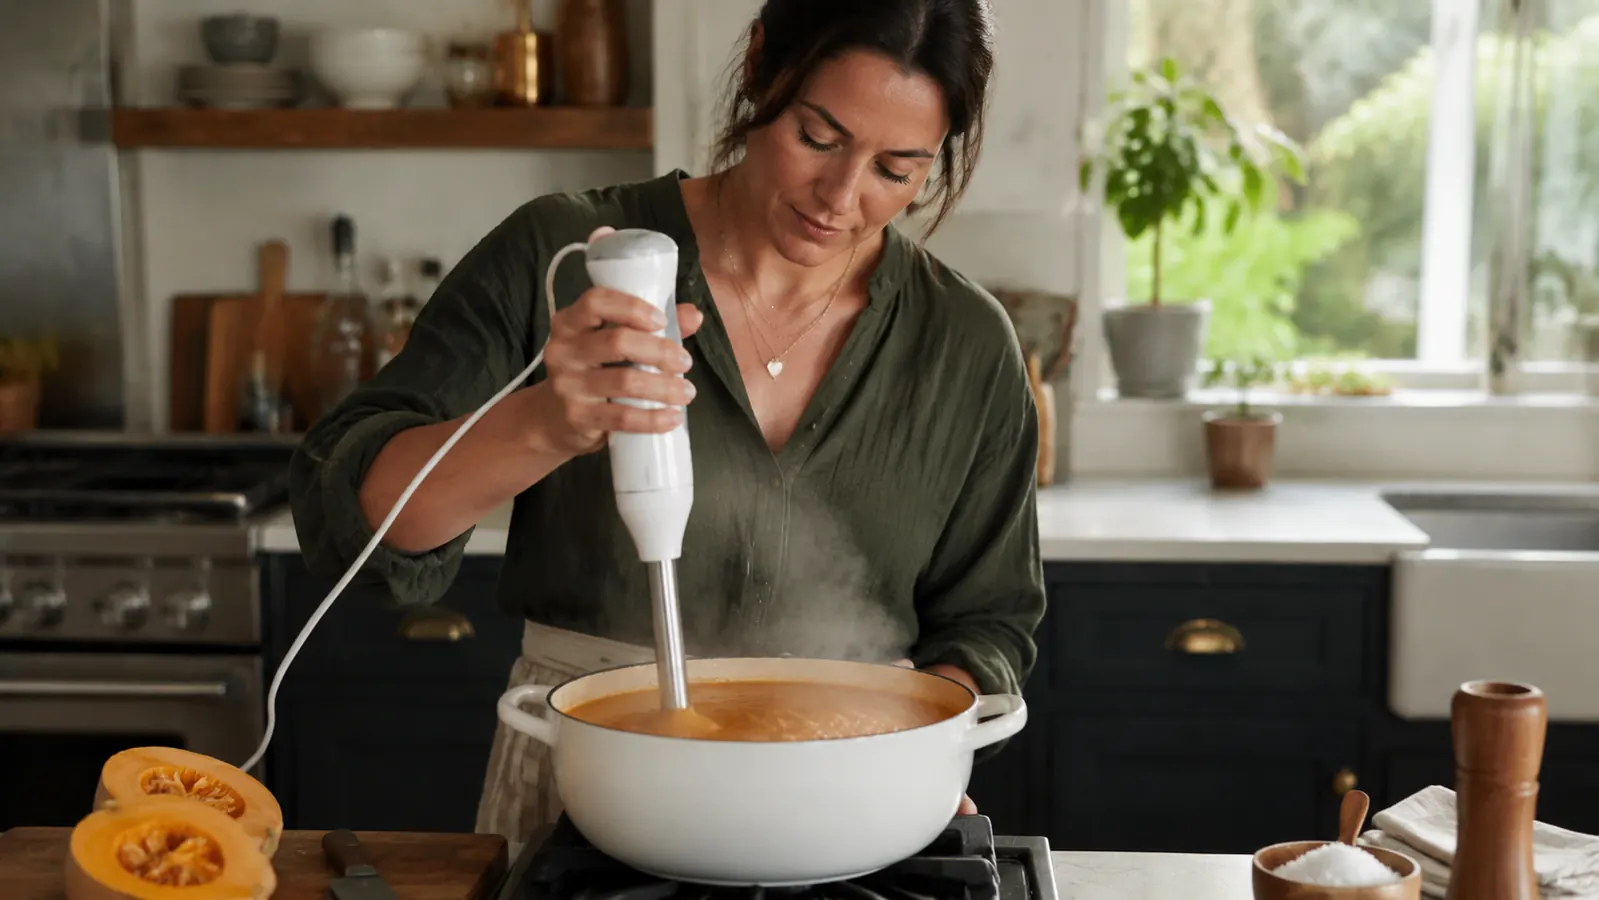
An immersion blender fixed that problem completely. You lower it into the pot, press a button, and in under 90 seconds you have a velvety, restaurant-smooth soup without touching a separate appliance. The technique matters almost as much as the tool, though. Get it wrong and you end up with hot splatter, uneven texture, or a motor that strains and overheats. This guide walks through the exact steps I use every week, built around the KOIOS 5-in-1 Hand Immersion Blender, which runs 1000W across 12 speeds and is what I reach for every time soup is on the menu.
Stop burning yourself on blender transfers. Here is the stick blender that handles every soup I make.
The KOIOS 5-in-1 Immersion Blender has 1000W of power, 12 speeds, and a detachable blending arm that drops right into your pot. Rated 4.5 stars across more than 14,000 home cooks.
Amazon Check Today's Price on Amazon →What You Need Before You Start
You do not need much. A pot deep enough to hold your soup without it sloshing over the sides is the main thing. Shallow pans are a splatter risk with any immersion blender. A wide, deep Dutch oven or stockpot is ideal. The KOIOS blending shaft is about 7 inches long, which works well in any pot that holds 3 quarts or more.
You also want your soup fully cooked before you blend. Underdone vegetables will not blend smoothly no matter how long you run the motor. Carrots, squash, and sweet potatoes should be completely fork-tender. Onions should be translucent and soft all the way through. Rushing this step is the single most common reason home-cooked soups come out gritty or stringy instead of silky.
Step 1: Reduce the Heat and Pull the Pot Off the Burner
Turn off the heat or move the pot to a cool burner before you put the blender in. You do not need the soup to be cold, just off active heat. A rolling boil and an immersion blender is how you get a soup geyser. The soup can be hot, around 160 to 180 degrees, but it should not be actively bubbling when the blending arm goes in.
This step also protects the motor. Sustained high temperatures can shorten the life of the seal around the blending shaft over time. Letting the soup settle off direct heat for even two minutes makes a real difference. Use that time to gather any finishing ingredients you plan to add after blending, like cream, fresh herbs, or a squeeze of lemon.
Step 2: Submerge the Blending Head Fully Before Pressing the Button
This is the step most people skip, and it is why they end up with soup on the backsplash. Lower the blending arm until the blending head is fully submerged and tilted slightly toward the side of the pot, not aimed straight up at the surface. Starting with the head at the surface creates an air pocket that the blades immediately shred into a hot mist and spray outward.
On the KOIOS, I start on speed 4 or 5 rather than the highest setting. High speed from a cold start, especially if there are larger chunks still in the pot, can cause uneven blending and more splatter. A lower starting speed lets the blender work into the texture before you step up the power. Once the soup around the head is mostly smooth, increase to speed 8 or 9 to finish.
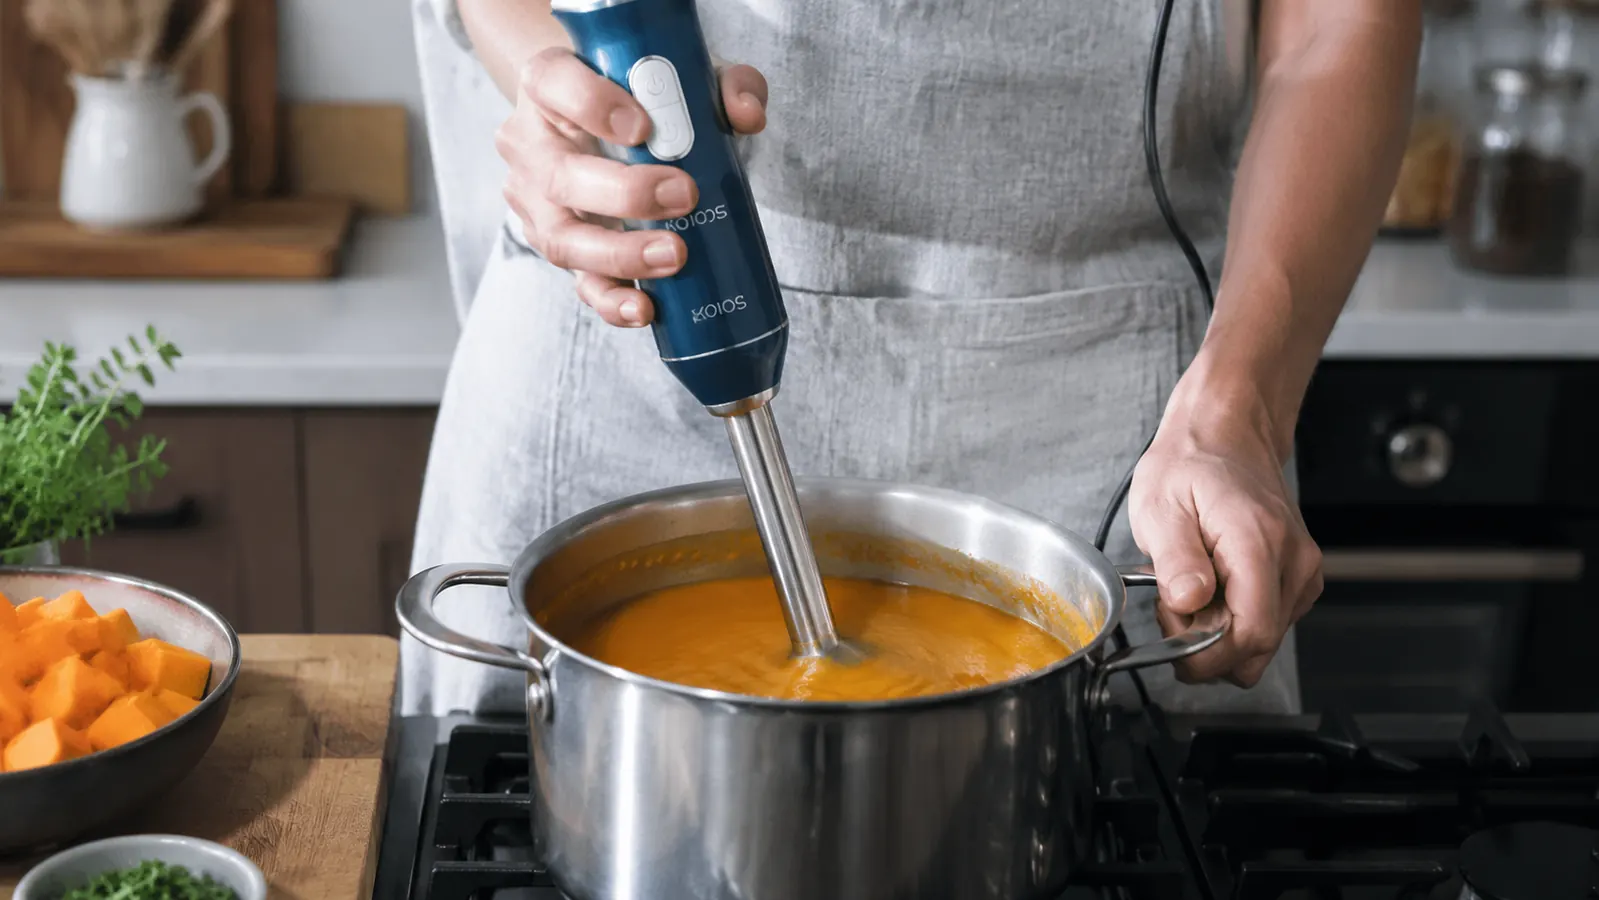
Step 3: Move the Blender in a Slow, Circular Pattern
Do not hold the blender in one spot and expect the soup to circulate on its own. Move it slowly through the pot in a wide, lazy circle, tilting the head at different angles as you go. This pulls unblended chunks into the blade zone and ensures the whole batch gets processed evenly. Pay extra attention to the corners and edges of the pot where pieces tend to hide.
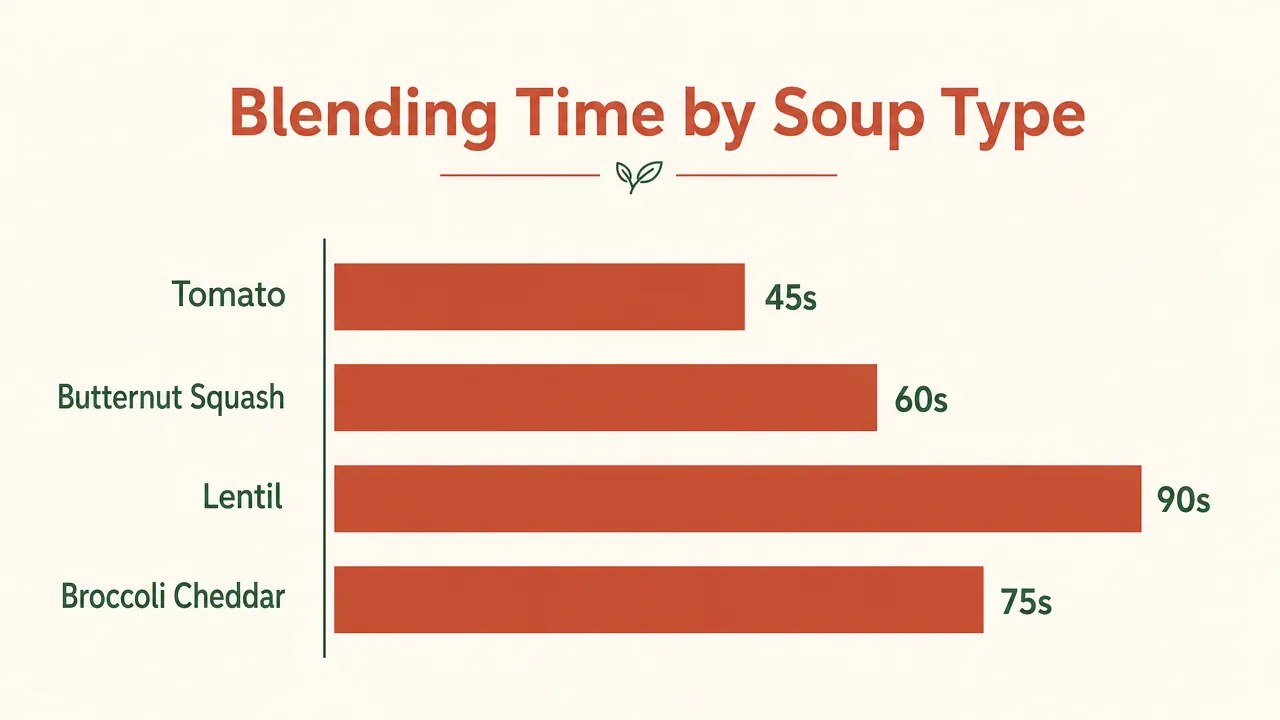
For a 4-quart pot of soup, I typically spend about 60 to 90 seconds blending in this circular motion before checking the texture. Dip a spoon in and drag it across the back. If it coats the spoon cleanly and you see no chunks when you tilt the spoon sideways, you are done. If there are still visible bits, go another 20 to 30 seconds with the speed stepped up one notch.
If the soup still has stringy bits after 90 seconds at full speed, the issue is almost always undercooked vegetables, not blender power. Stop blending, add a splash more broth, return the pot to low heat for five more minutes, and try again. The KOIOS motor is more than capable of fully pureeing cooked squash, potato, carrot, or lentils. Stringy texture is a prep issue, not a power issue.
Step 4: Lift the Blender Out Before Releasing the Button
Same principle as submerging before you start: the blade needs to stop spinning before it breaks the surface of the liquid. If you lift the blending head out while it is still running, the exposed blade flings soup in a wide arc. One quick, clean burst of splatter is usually what teaches people this lesson permanently. Release the trigger, wait a half second for the blade to fully stop, then lift.
The KOIOS uses a two-button trigger design, one main power button and a turbo boost. When I am done blending, I release both, count one beat, then slowly pull the shaft straight up out of the pot. Wipe the shaft with a damp cloth before setting it down so you are not tracking soup across the counter.
Step 5: Adjust Texture and Finish Before Serving
Blending changes the consistency of soup faster than most people expect, especially soups with starchy vegetables like butternut squash or lentils. If the soup comes out thicker than you wanted, add warm broth or water a quarter cup at a time and blend for 10 seconds to incorporate. If it is thinner than you expected, you can blend longer, which emulsifies the starch further and thickens the texture without adding anything.
Finishing additions go in after blending, not before. Cream or coconut milk will thin the texture slightly, so add those first, stir to combine, and taste before adjusting seasoning. Fresh herbs like basil or chives stay brighter when they go in after the heat is off. A small knob of cold butter stirred in at the end gives a restaurant-quality gloss that you will notice immediately. Season with salt last, after all your finishing ingredients are in, because everything concentrates during blending.

What Else Helps
Roasting your vegetables before adding them to the pot is the single biggest upgrade to flavor you can make without changing the technique at all. Toss cubed butternut squash or carrots with a little olive oil, roast at 400 degrees until the edges caramelize, then add them to your broth and simmer for 15 minutes before blending. The depth of flavor compared to raw-simmered vegetables is not subtle. It is the difference between a soup that tastes like something from a restaurant and one that tastes like it came from a box.
If you are making a soup with fibrous greens like kale or spinach, add them in the last few minutes of simmering rather than cooking them for the full time. Overcooked greens turn bitter and brown. They blend perfectly after just a few minutes of wilting, and the color stays a vibrant green instead of army-drab. This matters most for soups where the color is part of the appeal, like a leek and potato blended with watercress or a spinach and white bean.
For soups you want partially blended, with some texture remaining, blend only half the pot and stir the two halves back together. This is a classic restaurant technique for lentil soup and black bean soup. Blend about 60 percent of the volume smooth, leave the rest intact, and the final texture has body and interest without being either fully chunky or fully pureed. The KOIOS gives you fine enough speed control to do this gradually without overshooting into fully smooth before you realize it.
Seasoning is the other piece most home cooks get wrong at this stage. Blending concentrates flavors and also changes how salt registers on the palate, so the amount that tasted right before blending may be too little or occasionally too much afterward. Taste the soup immediately after blending, wait 30 seconds, then taste again. Give the salt a moment to bloom through the fully emulsified liquid before adding more. Acid helps too: a small squeeze of lemon or a splash of white wine vinegar brightens blended soups the way it does salad dressing, by lifting the other flavors rather than adding tartness.
Blending changes the consistency of soup faster than most people expect. Add broth a quarter cup at a time rather than guessing, and taste after each addition before going further.
Cleanup is genuinely one of the reasons I reach for the immersion blender over the countertop blender on busy weeknights. The KOIOS shaft detaches from the motor body and goes straight into the dishwasher. I run it under the faucet for five seconds first to knock off the bulk of the residue, then it sits in the top rack and comes out clean. Compare that to disassembling a countertop blender lid, jar, blade assembly, and gasket, all of which need to be dried and reassembled. The time difference is not trivial.
One caveat worth mentioning: the KOIOS, like most immersion blenders, is not the right tool for truly fibrous or very dense ingredients like raw ginger root, whole uncooked nuts, or frozen solid fruit. For those you still want a high-powered countertop blender. But for every cooked soup I make, which covers at least a dozen recipes I rotate through regularly, it handles the job cleanly. If you want a full breakdown of where the KOIOS excels and where it has limits, the 6-month long-term review covers that in detail.
If you are still on the fence about whether an immersion blender belongs in your kitchen at all, the piece on why a stick blender beats a countertop model for everyday cooking makes the case more broadly. The short version: less cleanup, less danger with hot liquids, smaller footprint, and genuinely good results on the soups and sauces most home cooks actually make.
Ready to make soup without the splash burns and the blender gymnastics?
The KOIOS 5-in-1 Immersion Blender is what I use every week. One tool, one cleanup, velvety results every time. Over 14,000 home cooks agree it earns the drawer space.
Amazon Check Today's Price on Amazon →